> ## Documentation Index
> Fetch the complete documentation index at: https://docs.kisuke.dev/llms.txt
> Use this file to discover all available pages before exploring further.
# Zen mode
> Keep your conversation at the center and bring files, review, terminals, and the browser into view when you need them.
Zen mode puts the conversation at the center of your workspace. Use it to discuss a change, follow an agent's work, and open supporting tools beside the conversation.
Zen is a workspace layout. Your [provider, harness, and model](/models/overview) are separate choices: use an available OpenAI, Anthropic, Google, or other model while keeping the same workspace arrangement.
The desktop and web instructions below use **Switch layout** and the right panel. You can also [continue the conversation on your phone](#continue-on-your-phone), or use the [tablet Zen workspace](#use-zen-on-a-tablet) on iPad and Android tablets.
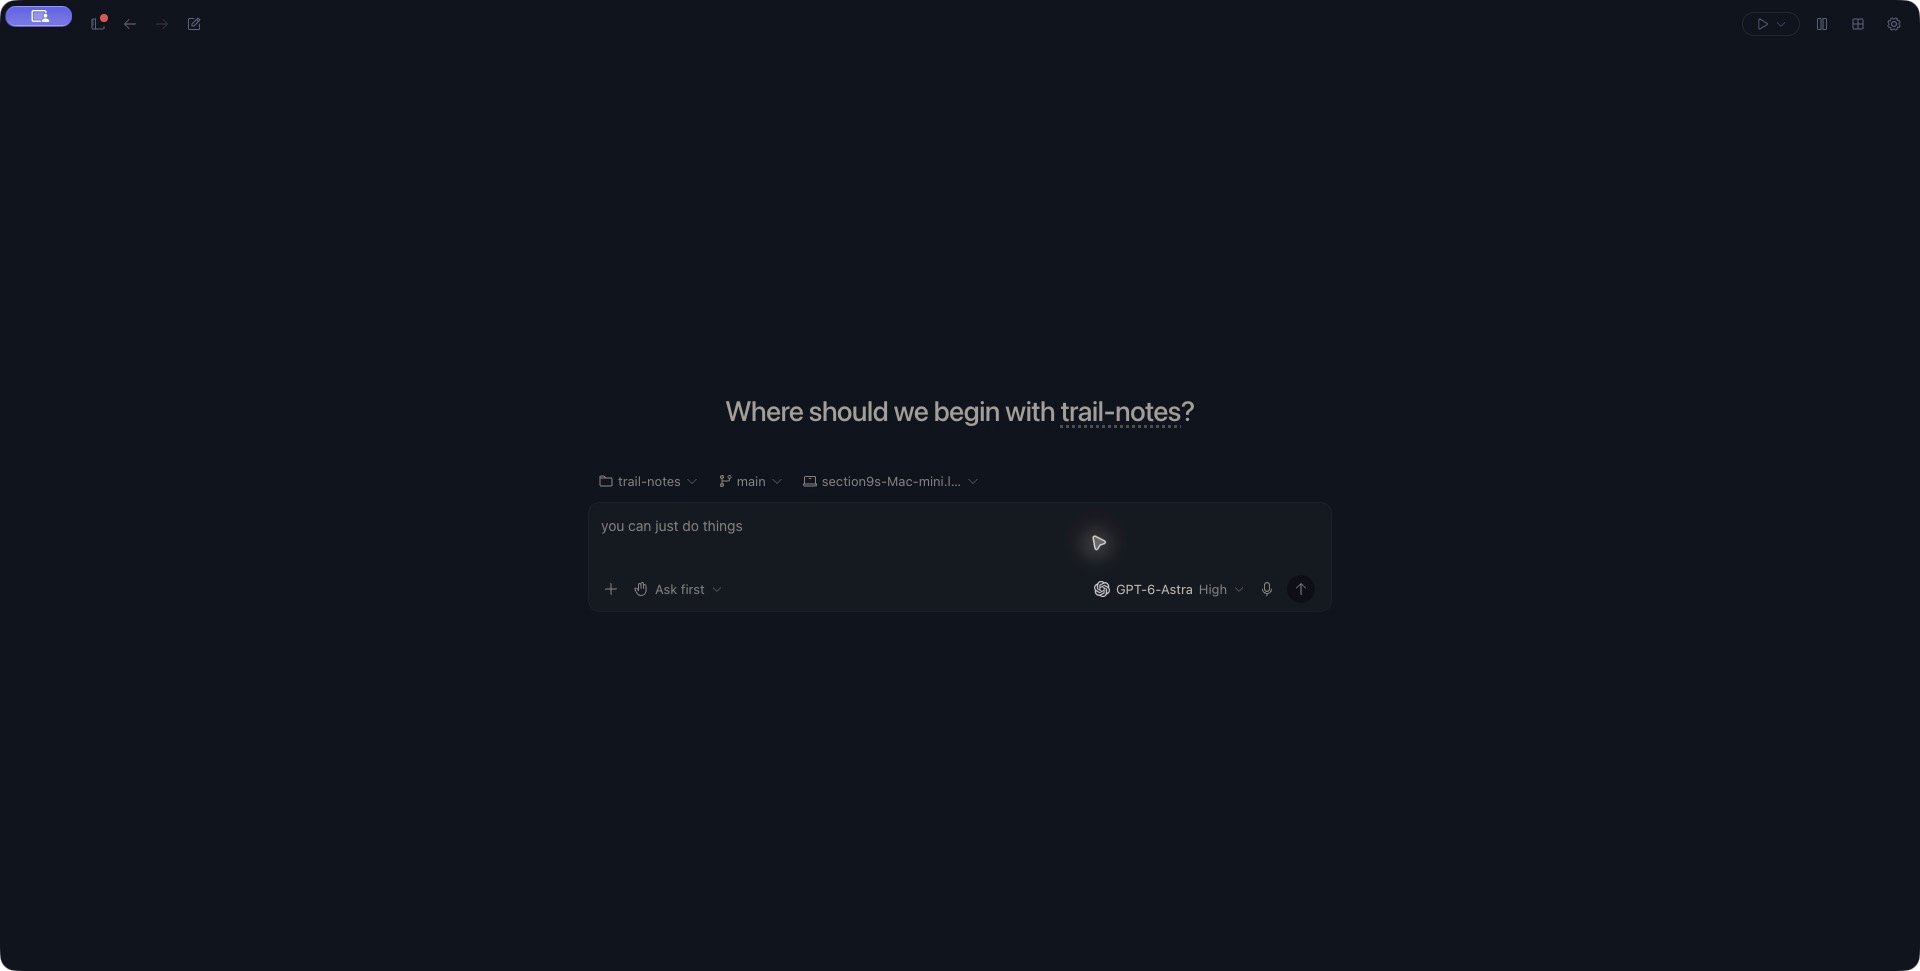
## Enter Zen mode
1. Open **Switch layout** in the top bar.
2. Choose **Zen**. If the menu stays open, press **Escape** to dismiss it.
3. Check the conversation and composer before continuing your work.
To leave Zen, choose another available layout, such as **Classic**, from the same menu. Choosing a layout changes the current workspace view; it does not select a different model or send a message.
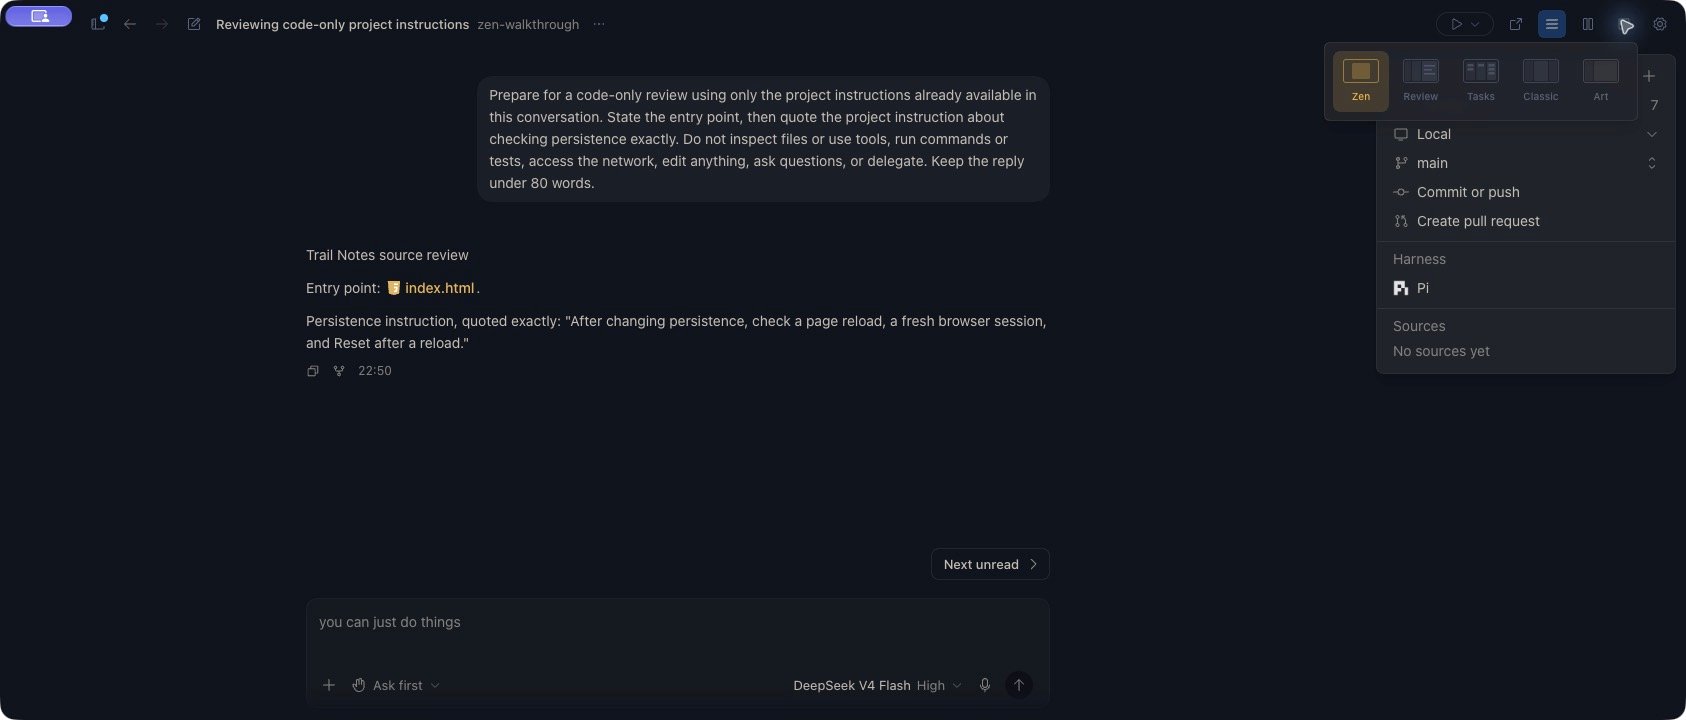
You can also open the command palette with **Cmd+Shift+P** on macOS or **Ctrl+Shift+P** on Windows and Linux. Search for **Toggle Zen Mode** and press **Enter**. From Classic, this opens Zen; from Zen, it opens Classic. Use **Switch layout → Zen** when you want to select Zen directly.
To choose the layout Kisuke opens with, open **Settings → General → Default workspace mode** and select **Zen**. A temporary layout switch does not change this preference. See [Settings and defaults](/reference/settings#make-zen-your-launch-layout) for the distinction between the launch layout and the current workspace.
| Your intention | Control |
| - | - |
| Use Zen now | **Switch layout → Zen**. |
| Open Kisuke in Zen next time | **Settings → General → Default workspace mode → Zen**. |
| Focus the presentation of worktree conversations | **Settings → General → Work mode → Worktree style**; see [Use Worktree style](#use-worktree-style). |
The two **Classic** choices in General belong to different groups. **Work mode → Classic** turns off Worktree style; **Default workspace mode → Classic** changes the launch layout. Read the group title before changing a card.
## Find your way around
| Area | Use it to |
| - | - |
| Conversation | Read responses and write your next request. |
| Sidebar | Move between projects and conversations, start a new task, or [browse plugins](/customization/plugins). |
| Composer | Attach files and choose the model and permissions for your request. |
| Right panel | Open Review, Terminal, Browser, Files, or Side Chat alongside the conversation. |
| Environment summary | See the conversation's project context and Git controls when a conversation is open. |
Hide or show the sidebar with **Cmd+B** on macOS or **Ctrl+B** on Windows and Linux. When it is hidden, moving the pointer to the left edge can reveal it temporarily. Use the sidebar button to keep it open.
The workspace adapts to the space available. The environment summary may stop appearing beside the conversation when the window is narrow; use **Show summary** to open it when needed. **Hide summary** closes that view without closing the conversation.
To return to earlier work, [find a conversation](/conversations/find-conversations) using project grouping, status filters, archived views, and device scope.
For a project on another computer, [connect the device and choose its folder](/workspace/devices). Check the destination before sending a prompt or using the terminal.
To explore another approach from a completed response, [continue in a separate chat or worktree](/conversations/continue-from-response). Keep the original discussion available while the new conversation takes its own direction.
## Take a first tour
Start with a small project you recognize, a connected computer, and a [model that can complete a response](/models/providers#verify-a-complete-response). This tour asks for an explanation and leaves implementation for a later request.
[Open the project folder](/projects/open-a-project), then check its project, branch, and device controls above the new conversation's composer. Open **Files** and a familiar document if you need to confirm which copy of the project you are viewing.
A folder on another computer belongs to that computer. Check the device as well as the folder name.
Open the composer model picker. For a new conversation, choose an available harness and model. Select **Plan** in the permission menu when your harness offers it, then describe what to investigate.
For a project with a README, try:
> Read the project's README and the main source file it describes. Explain what the project does, name the entry point, and suggest one small improvement. Do not edit files or run setup, tests, or servers. Finish with the files you read and any uncertainty.
Adapt the filenames and scope to your project. You can [dictate the prompt](/conversations/attachments#dictate-a-prompt), then review and edit its text. Selecting a model or permission mode does not send the request; submit it from the composer. If the first response fails, follow the displayed error and [first-message recovery guide](/help/starting-a-chat).
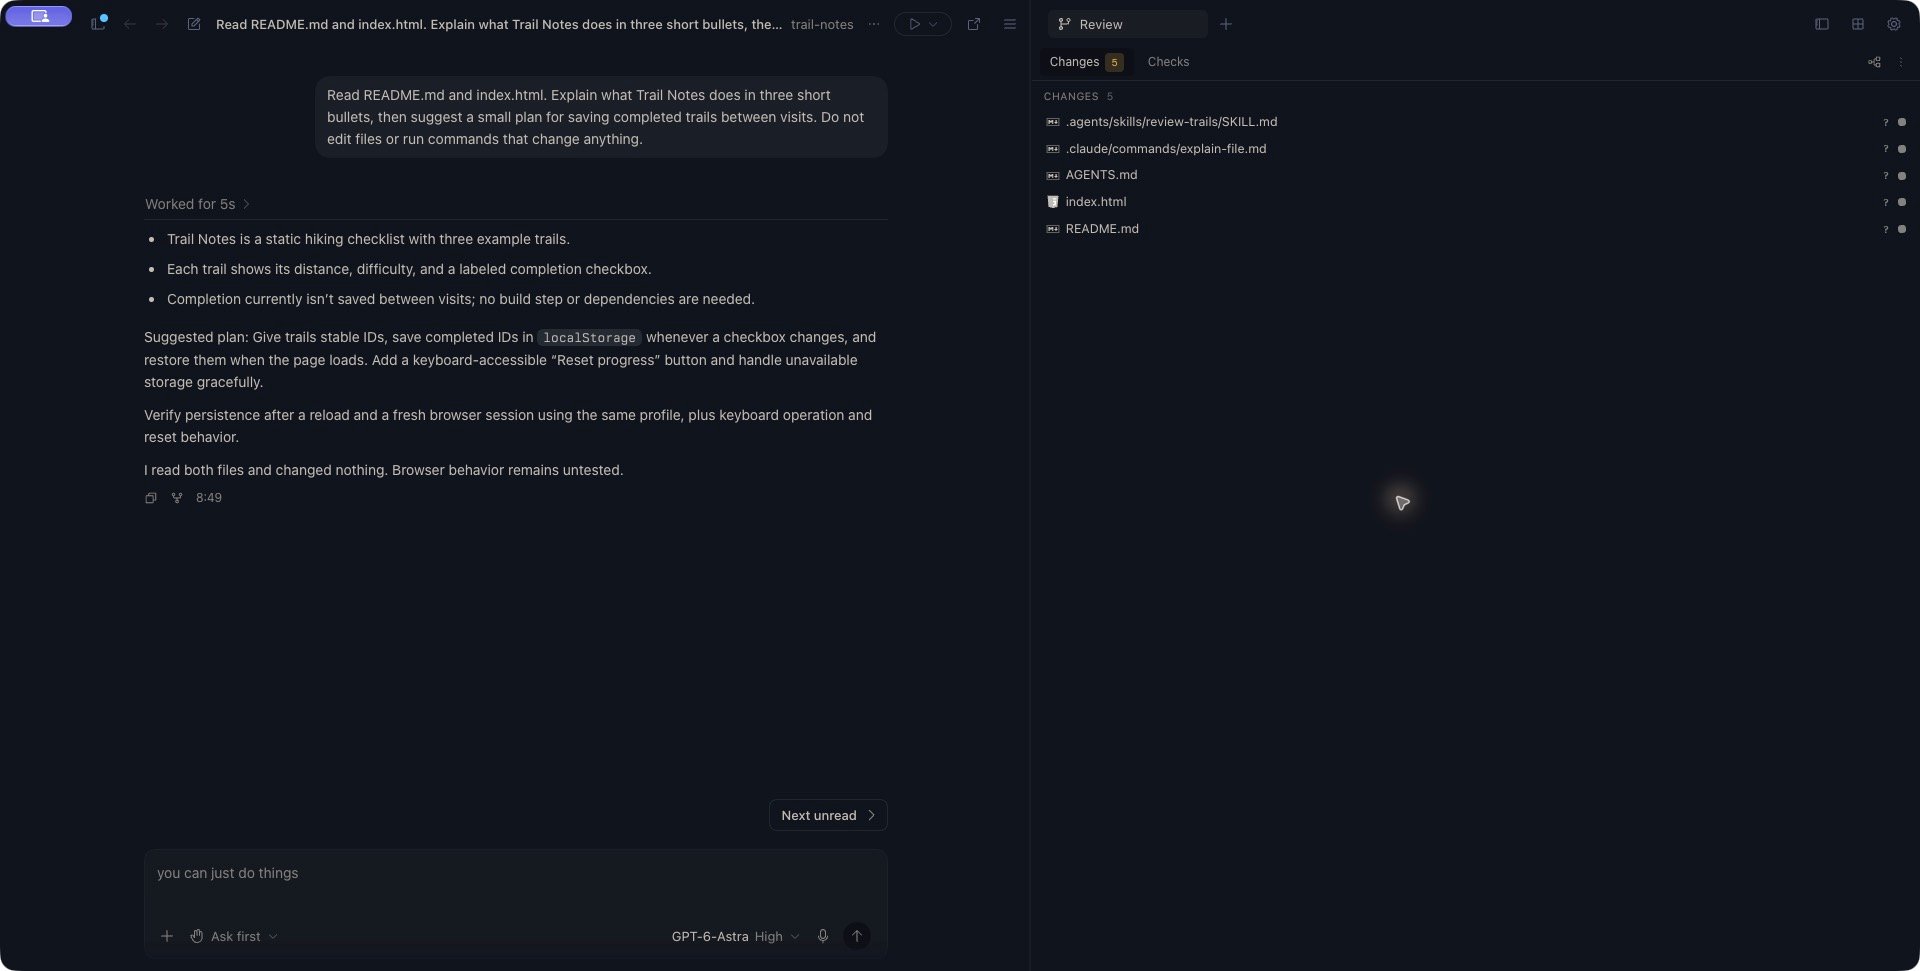
Choose **Open right panel** in the top bar, then **Files**. If another tool is already open, use **+**, labelled **Open new tab menu**, and choose **Files** from the empty search menu.
Open a file named in the response and compare its contents with the explanation. Use **Browse Files** if the file tree is hidden. Drag the divider to give the document more room, and keep your follow-up in the main conversation.
Ask a follow-up if an assumption or file path is unclear. For a Git project, open **Review** in another panel tab to inspect the current changed-file list. Existing changes may predate this conversation; the list alone does not establish who made them.
When you want implementation, follow [Plan before implementing](/conversations/planning#refine-a-plan-written-in-chat) to choose permissions and submit the change you intend. A completed explanation or plan is not an implemented change.
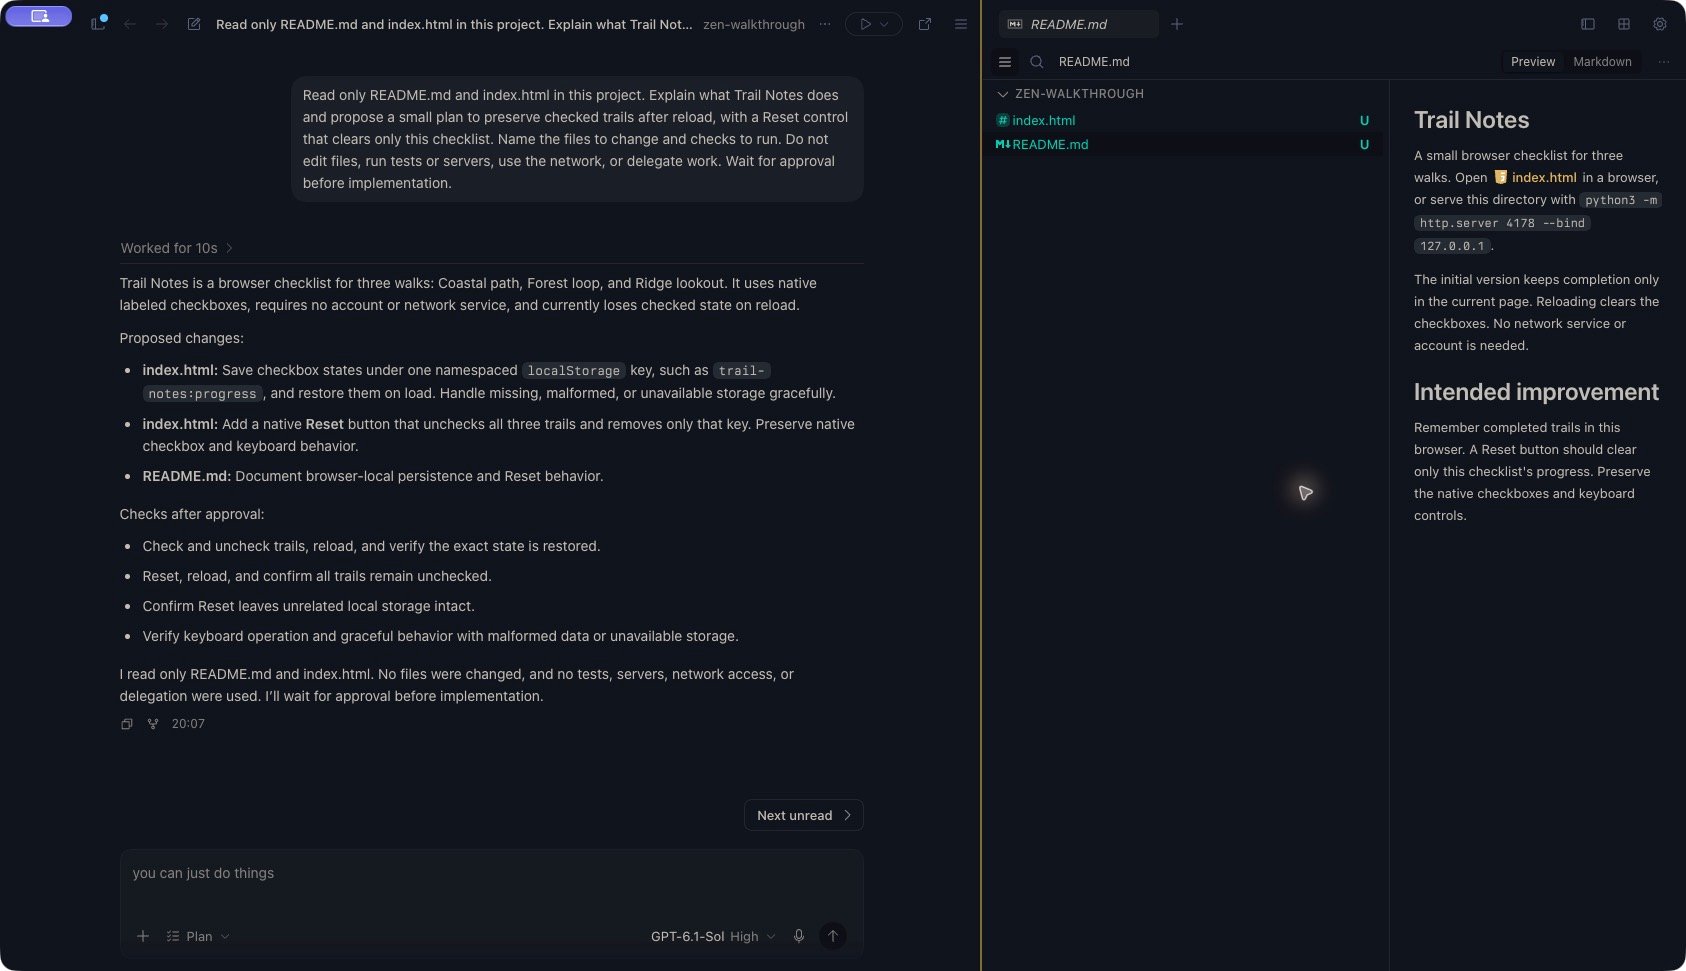 [Open this workspace screenshot at full size](/images/screenshots/zen-plan-and-files.jpg).
## Implement and verify a small change
After the first tour, choose one behavior you can check in your own project. This desktop walkthrough connects planning, implementation, testing, and Git review while keeping the same Zen conversation.
Start with the intended project, device, and a working model. For a Git project, inspect **Review → Changes** before requesting edits so you know what was already changed. Use a [worktree](/projects/worktrees) first if you need a separate working folder.
Select **Plan** when your harness supports it. Describe the current behavior, the result you want, and what should stay unchanged. For a browser checklist, adapt this example:
> Plan a change that keeps checked items after reloading the page. Add a Reset control that clears only this checklist's saved progress. Preserve the existing layout and keyboard controls. Inspect the current implementation and propose the files to change, failure handling, and checks. Wait for my approval before implementation.
Read the proposal against your project. Resolve assumptions and confirm what Reset should affect before allowing edits. See [Plan before implementing](/conversations/planning) for revising an ordinary response or a submitted plan.
For a plan written as an ordinary response, choose an appropriate permission mode, such as **Ask first**, and send a follow-up:
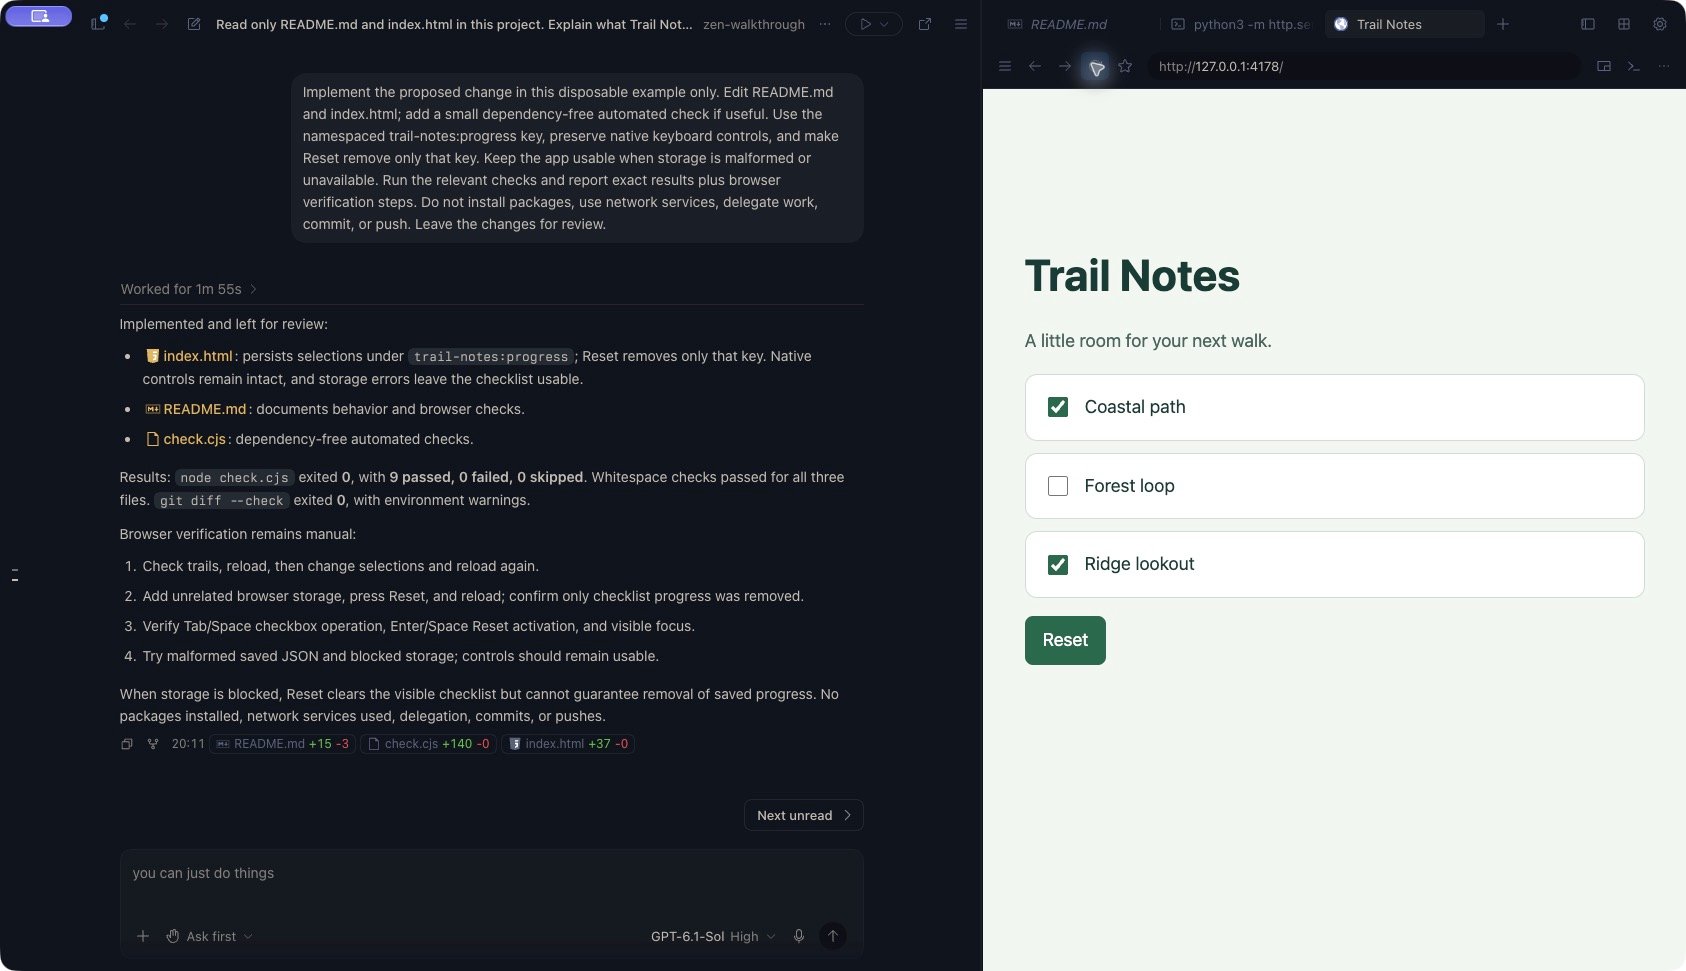
> Implement the agreed plan. Preserve unrelated edits. Run the relevant existing checks and report their commands and results. Explain how I can verify the behavior in the app. Leave the changes uncommitted for review.
If you have a **Plan ready** card instead, follow [Review a submitted plan](/conversations/planning#review-a-submitted-plan). Read each approval request in context; a request for broader access is a separate decision from approving the feature.
Open **Files** beside the conversation and read the changed files. Use **Review → Changes** to compare the current file list with the scope you agreed on.
If a Markdown preview you opened earlier still shows the old text, follow [Refresh a file changed elsewhere](/workspace/files#respond-to-a-file-changed-elsewhere) before reviewing it.
Open a **Terminal** tab, check its working directory, and run the relevant checks documented by your project. There is no single test command for every repository. Compare the output with the agent's report, including failed or skipped checks.
If something fails, [add the relevant terminal output to the conversation](/workspace/terminal#copy-output-into-a-conversation) and describe the expected result. Ask for a focused correction, then rerun the affected checks.
For a web app, start its development server and [open the reported address in Browser](/workspace/browser#preview-your-project). Keep the server's terminal tab available while testing.
In the checklist example, check an item and reload. Confirm that it stays checked. Use Reset, reload again, and confirm that the progress stays cleared. Check that unrelated settings remain intact and that keyboard interaction still works. Include the failure cases agreed in the plan.
Tell the agent what actually happened if any check fails. A passing command and a completed response are evidence to review alongside the app's behavior.
Wait for editing to finish, then inspect the final file contents and **Review → Changes** again. [Stage the intended files](/workspace/git#stage-a-file).
To record only that staged selection, use [Commit staged files](/workspace/commit-and-push#commit-staged-files) and clear **Include unstaged changes**. Inspect the result after committing. Pushing is a separate choice that requires checking the remote and branch.
[Open this workspace screenshot at full size](/images/screenshots/zen-plan-and-files.jpg).
## Implement and verify a small change
After the first tour, choose one behavior you can check in your own project. This desktop walkthrough connects planning, implementation, testing, and Git review while keeping the same Zen conversation.
Start with the intended project, device, and a working model. For a Git project, inspect **Review → Changes** before requesting edits so you know what was already changed. Use a [worktree](/projects/worktrees) first if you need a separate working folder.
Select **Plan** when your harness supports it. Describe the current behavior, the result you want, and what should stay unchanged. For a browser checklist, adapt this example:
> Plan a change that keeps checked items after reloading the page. Add a Reset control that clears only this checklist's saved progress. Preserve the existing layout and keyboard controls. Inspect the current implementation and propose the files to change, failure handling, and checks. Wait for my approval before implementation.
Read the proposal against your project. Resolve assumptions and confirm what Reset should affect before allowing edits. See [Plan before implementing](/conversations/planning) for revising an ordinary response or a submitted plan.
For a plan written as an ordinary response, choose an appropriate permission mode, such as **Ask first**, and send a follow-up:
> Implement the agreed plan. Preserve unrelated edits. Run the relevant existing checks and report their commands and results. Explain how I can verify the behavior in the app. Leave the changes uncommitted for review.
If you have a **Plan ready** card instead, follow [Review a submitted plan](/conversations/planning#review-a-submitted-plan). Read each approval request in context; a request for broader access is a separate decision from approving the feature.
Open **Files** beside the conversation and read the changed files. Use **Review → Changes** to compare the current file list with the scope you agreed on.
If a Markdown preview you opened earlier still shows the old text, follow [Refresh a file changed elsewhere](/workspace/files#respond-to-a-file-changed-elsewhere) before reviewing it.
Open a **Terminal** tab, check its working directory, and run the relevant checks documented by your project. There is no single test command for every repository. Compare the output with the agent's report, including failed or skipped checks.
If something fails, [add the relevant terminal output to the conversation](/workspace/terminal#copy-output-into-a-conversation) and describe the expected result. Ask for a focused correction, then rerun the affected checks.
For a web app, start its development server and [open the reported address in Browser](/workspace/browser#preview-your-project). Keep the server's terminal tab available while testing.
In the checklist example, check an item and reload. Confirm that it stays checked. Use Reset, reload again, and confirm that the progress stays cleared. Check that unrelated settings remain intact and that keyboard interaction still works. Include the failure cases agreed in the plan.
Tell the agent what actually happened if any check fails. A passing command and a completed response are evidence to review alongside the app's behavior.
Wait for editing to finish, then inspect the final file contents and **Review → Changes** again. [Stage the intended files](/workspace/git#stage-a-file).
To record only that staged selection, use [Commit staged files](/workspace/commit-and-push#commit-staged-files) and clear **Include unstaged changes**. Inspect the result after committing. Pushing is a separate choice that requires checking the remote and branch.
 ## Continue on your phone
Keep the project on its computer and open the same conversation from your phone. The phone uses separate **Chat**, **Terminal**, **Editor**, and **Browser** destinations; it does not use the desktop right-panel layout.
Before leaving your desk, keep the project computer awake, online, and running Connect. Note the conversation title, project, and computer. Review the latest response so you know whether work has finished or still needs a decision.
1. [Pair your phone](/workspace/devices#pair-your-phone) if needed. If it is already signed in, open **Devices**, choose the project computer, and [check its connection and workspace](/workspace/devices#on-your-phone).
2. In **Chat**, tap **Show chat list** and select the existing conversation. Use [project browsing or title search](/conversations/find-conversations#find-and-resume-on-your-phone) to find it. Starting a new chat creates a separate conversation.
3. Wait for the transcript and check the latest exchange against the conversation you left on desktop. A title appearing above a loading view is not enough. If a question or permission request is pending, review that request before sending another instruction.
4. Open **Chat settings** in the composer and review **Model**, any available **Effort** setting, and **Permission**. Existing conversations keep their harness. To confirm the working folder, open **Editor** and read a familiar project file, then return to Chat.
5. Send one focused follow-up when the connection is ready. Wait for its completed response and check any reported error before continuing.
For a first follow-up after the checklist example above, you could ask:
> From this conversation, summarize the checklist change, the checks already reported, and anything still unverified. Do not edit files, run commands, or repeat implementation. Keep the answer brief.
Compare the answer with the earlier messages. A summary reports the conversation's history; it does not run fresh tests or establish the current contents of a file.
### If the phone is still connecting
**Connecting...**, **Reconnecting...**, or **You are offline** in the composer means you need to check the [project computer's connection](/workspace/devices#diagnose-missing-or-unavailable-devices). If **Complete the pending request to continue** appears, inspect the question or permission request in the conversation.
If you lose the connection after sending, return to the same conversation and inspect its latest messages before sending again. The missing response on your phone does not establish whether the original request reached the computer. Keep any error message and use [response recovery](/help/starting-a-chat#if-a-response-starts-then-fails) when the conversation cannot continue.
### Return to desktop
Select the same conversation in the Zen sidebar and wait for its transcript. Look for the follow-up you sent from the phone and its result before issuing the next instruction. If either is missing, check the owning computer and connection first.
Open **Files** or **Review** beside the conversation to inspect any project changes. Switching clients does not replace that review. For a server running on the project computer, follow [Preview from your phone](/workspace/browser#preview-from-your-phone) to inspect it while away from your desk.
## Bring tools beside the conversation
Choose **Open right panel** in the top bar. An empty panel shows a launcher; a panel with an active tab returns to that tool. Use **+**, labelled **Open new tab menu**, to choose another destination:
* **Review** for [inspecting Git status and staging files](/workspace/git).
* **Terminal** for a command-line session.
* **Browser** for a browser tab.
* **Files** for browsing and opening project files.
* **Side Chat** for a [temporary discussion with its own composer](/conversations/side-chat), when the harness supports it.
Use the panel's tabs to move between open tools. Drag the divider to adjust how much space the panel takes. Review and Files are reusable destinations; choosing Terminal or Browser can create another tab.
Clear the new-tab menu's search field to see the tool choices. When you type a filename, it can show both browser suggestions and file results. Select the intended **Files** result: the first Enter target can be a web search, not the file you meant to open. Use **Up** and **Down** to choose a result, **Enter** to open it, and **Escape** to dismiss the menu.
Follow the [Files and editor](/workspace/files) guide to browse, preview, and save a document, or the [Terminal](/workspace/terminal) guide to open a shell beside your conversation.
For a web project, [preview the running app in Browser](/workspace/browser). Keep the server terminal available in another panel tab so you can check its output while inspecting the page.
To investigate outside documentation or release notes, [ask for web research](/workspace/browser#research-web-sources-from-zen) in the conversation. Specify the sources and versions you need, then compare the answer with the cited pages beside your chat.
Use [project scripts](/projects/scripts) for a repeatable Setup command or a Run command whose output appears beside the conversation. You can start a server, open its printed link in Browser, and return to Run to stop it.
## Continue on your phone
Keep the project on its computer and open the same conversation from your phone. The phone uses separate **Chat**, **Terminal**, **Editor**, and **Browser** destinations; it does not use the desktop right-panel layout.
Before leaving your desk, keep the project computer awake, online, and running Connect. Note the conversation title, project, and computer. Review the latest response so you know whether work has finished or still needs a decision.
1. [Pair your phone](/workspace/devices#pair-your-phone) if needed. If it is already signed in, open **Devices**, choose the project computer, and [check its connection and workspace](/workspace/devices#on-your-phone).
2. In **Chat**, tap **Show chat list** and select the existing conversation. Use [project browsing or title search](/conversations/find-conversations#find-and-resume-on-your-phone) to find it. Starting a new chat creates a separate conversation.
3. Wait for the transcript and check the latest exchange against the conversation you left on desktop. A title appearing above a loading view is not enough. If a question or permission request is pending, review that request before sending another instruction.
4. Open **Chat settings** in the composer and review **Model**, any available **Effort** setting, and **Permission**. Existing conversations keep their harness. To confirm the working folder, open **Editor** and read a familiar project file, then return to Chat.
5. Send one focused follow-up when the connection is ready. Wait for its completed response and check any reported error before continuing.
For a first follow-up after the checklist example above, you could ask:
> From this conversation, summarize the checklist change, the checks already reported, and anything still unverified. Do not edit files, run commands, or repeat implementation. Keep the answer brief.
Compare the answer with the earlier messages. A summary reports the conversation's history; it does not run fresh tests or establish the current contents of a file.
### If the phone is still connecting
**Connecting...**, **Reconnecting...**, or **You are offline** in the composer means you need to check the [project computer's connection](/workspace/devices#diagnose-missing-or-unavailable-devices). If **Complete the pending request to continue** appears, inspect the question or permission request in the conversation.
If you lose the connection after sending, return to the same conversation and inspect its latest messages before sending again. The missing response on your phone does not establish whether the original request reached the computer. Keep any error message and use [response recovery](/help/starting-a-chat#if-a-response-starts-then-fails) when the conversation cannot continue.
### Return to desktop
Select the same conversation in the Zen sidebar and wait for its transcript. Look for the follow-up you sent from the phone and its result before issuing the next instruction. If either is missing, check the owning computer and connection first.
Open **Files** or **Review** beside the conversation to inspect any project changes. Switching clients does not replace that review. For a server running on the project computer, follow [Preview from your phone](/workspace/browser#preview-from-your-phone) to inspect it while away from your desk.
## Bring tools beside the conversation
Choose **Open right panel** in the top bar. An empty panel shows a launcher; a panel with an active tab returns to that tool. Use **+**, labelled **Open new tab menu**, to choose another destination:
* **Review** for [inspecting Git status and staging files](/workspace/git).
* **Terminal** for a command-line session.
* **Browser** for a browser tab.
* **Files** for browsing and opening project files.
* **Side Chat** for a [temporary discussion with its own composer](/conversations/side-chat), when the harness supports it.
Use the panel's tabs to move between open tools. Drag the divider to adjust how much space the panel takes. Review and Files are reusable destinations; choosing Terminal or Browser can create another tab.
Clear the new-tab menu's search field to see the tool choices. When you type a filename, it can show both browser suggestions and file results. Select the intended **Files** result: the first Enter target can be a web search, not the file you meant to open. Use **Up** and **Down** to choose a result, **Enter** to open it, and **Escape** to dismiss the menu.
Follow the [Files and editor](/workspace/files) guide to browse, preview, and save a document, or the [Terminal](/workspace/terminal) guide to open a shell beside your conversation.
For a web project, [preview the running app in Browser](/workspace/browser). Keep the server terminal available in another panel tab so you can check its output while inspecting the page.
To investigate outside documentation or release notes, [ask for web research](/workspace/browser#research-web-sources-from-zen) in the conversation. Specify the sources and versions you need, then compare the answer with the cited pages beside your chat.
Use [project scripts](/projects/scripts) for a repeatable Setup command or a Run command whose output appears beside the conversation. You can start a server, open its printed link in Browser, and return to Run to stop it.
 When you are ready to save a version, use the summary's **Commit or push** menu. Follow [Commit and push from Zen](/workspace/commit-and-push) to choose the staged-only or all-changes scope and inspect the result.
On desktop, after pushing, use **Review → Checks** to [create a pull request](/workspace/pull-requests), update its description, and inspect its reported checks beside the conversation. The web client uses a different Git panel, so it may not offer those same tabs.
### Hide tools without closing their tabs
Choose **Hide Panel** to give the conversation more room. **Open right panel** brings the tools area back; the panel toggle does not remove its tabs. **Cmd/Ctrl+backslash** also toggles the panel.
The **×** on an individual tab closes that tab. For a Terminal tab, closing can terminate its shell; use [terminal interruption and close guidance](/workspace/terminal#interrupt-hide-clear-or-close) before doing that with a running command. Hiding the panel does not stop a server or interrupt the agent's response.
If you close the last visible tab, the panel hides. Open it again to choose a tool from the launcher.
### Work in a smaller window
Opening the right panel reduces the space for the conversation. The summary can disappear from beside it and reopen as an overlay through **Show summary**. Widening the window can restore the docked arrangement; you do not need to open a new conversation.
The sidebar also adapts to the available width. Use its toggle to reopen it when it collapses. A temporary compact-window sidebar or summary choice is separate from the saved wide-window visibility preference.
At the narrowest widths, the right panel can take the main content area. Use **Hide Panel** to return to the conversation, or widen the window to keep both visible.
### Recover a separate chat window
An open desktop conversation has an **Open chat in new window** control in the top bar. It targets the selected conversation. Wait for the title, transcript, and composer to appear before using the new window; the window opening alone does not mean the chat is ready.
If the separate window stays blank or loading:
1. Close that window with its window close control, then return to the original Zen window.
2. Check the conversation title and latest response. If you moved to another conversation, [find and reopen the intended chat](/conversations/find-conversations).
3. Continue in the original composer after reviewing the model, permissions, and any response still in progress. If a new request fails, follow the [response troubleshooting guide](/help/starting-a-chat).
4. Use **Open right panel → Files** to open project documents beside the conversation. If a tool tab is already selected, use **+ → Files** instead.
In a desktop check with Pi and DeepSeek V4 Flash, the separate window remained on a spinner after reopening it once. Closing it left the original conversation usable: a new follow-up completed in the same chat, and Files opened the project's README. This check did not verify sending from the separate window.
When you are ready to save a version, use the summary's **Commit or push** menu. Follow [Commit and push from Zen](/workspace/commit-and-push) to choose the staged-only or all-changes scope and inspect the result.
On desktop, after pushing, use **Review → Checks** to [create a pull request](/workspace/pull-requests), update its description, and inspect its reported checks beside the conversation. The web client uses a different Git panel, so it may not offer those same tabs.
### Hide tools without closing their tabs
Choose **Hide Panel** to give the conversation more room. **Open right panel** brings the tools area back; the panel toggle does not remove its tabs. **Cmd/Ctrl+backslash** also toggles the panel.
The **×** on an individual tab closes that tab. For a Terminal tab, closing can terminate its shell; use [terminal interruption and close guidance](/workspace/terminal#interrupt-hide-clear-or-close) before doing that with a running command. Hiding the panel does not stop a server or interrupt the agent's response.
If you close the last visible tab, the panel hides. Open it again to choose a tool from the launcher.
### Work in a smaller window
Opening the right panel reduces the space for the conversation. The summary can disappear from beside it and reopen as an overlay through **Show summary**. Widening the window can restore the docked arrangement; you do not need to open a new conversation.
The sidebar also adapts to the available width. Use its toggle to reopen it when it collapses. A temporary compact-window sidebar or summary choice is separate from the saved wide-window visibility preference.
At the narrowest widths, the right panel can take the main content area. Use **Hide Panel** to return to the conversation, or widen the window to keep both visible.
### Recover a separate chat window
An open desktop conversation has an **Open chat in new window** control in the top bar. It targets the selected conversation. Wait for the title, transcript, and composer to appear before using the new window; the window opening alone does not mean the chat is ready.
If the separate window stays blank or loading:
1. Close that window with its window close control, then return to the original Zen window.
2. Check the conversation title and latest response. If you moved to another conversation, [find and reopen the intended chat](/conversations/find-conversations).
3. Continue in the original composer after reviewing the model, permissions, and any response still in progress. If a new request fails, follow the [response troubleshooting guide](/help/starting-a-chat).
4. Use **Open right panel → Files** to open project documents beside the conversation. If a tool tab is already selected, use **+ → Files** instead.
In a desktop check with Pi and DeepSeek V4 Flash, the separate window remained on a spinner after reopening it once. Closing it left the original conversation usable: a new follow-up completed in the same chat, and Files opened the project's README. This check did not verify sending from the separate window.
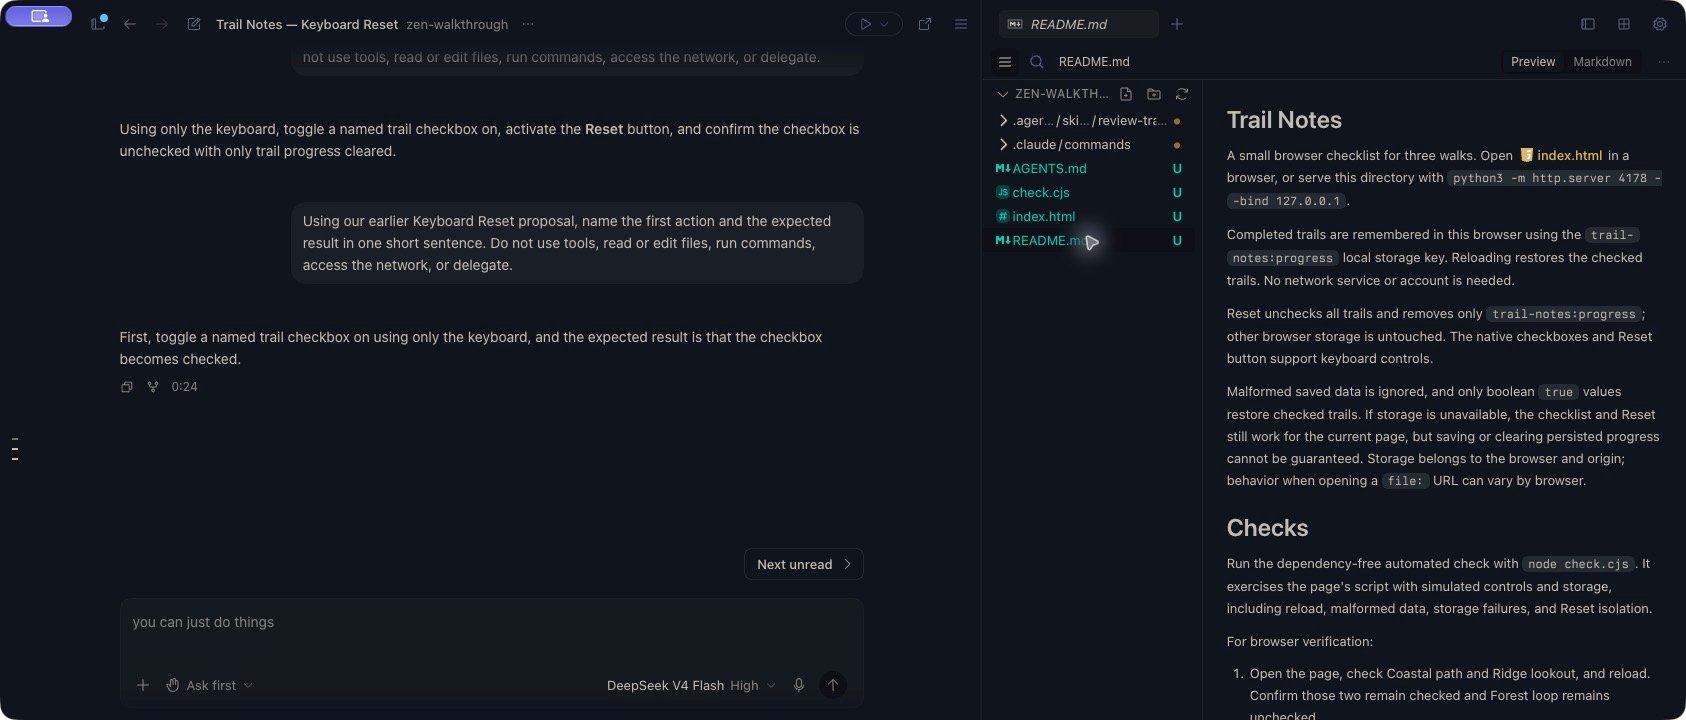 If reopening the separate window produces the same result, keep working in the original window and report the app version, operating system, affected conversation, and visible loading or error state. A loading window by itself does not identify a provider sign-in problem.
## Use Zen on a tablet
On iPad and Android tablets, Kisuke uses the Zen workspace automatically when the app window is large enough. [Connect to your project computer](/workspace/devices), open its workspace, and keep Connect running there. The computer still provides the files, terminals, and agent runtime.
### Open a conversation and a tool
1. Tap **Show chat list** in the chat header. Select an existing conversation and check its latest exchange before continuing. The list uses the same [project browsing and title search](/conversations/find-conversations#find-and-resume-on-your-phone) as the phone.
2. Tap **Open tools** in the chat header to open **Terminal**. Use the tool bar's **Terminal**, **Editor**, and **Browser** buttons to switch tools.
3. For a file mentioned in the conversation, choose **Editor**. If a document is already open, use **Show file tree** to browse to another file. With no document open, the file browser appears directly.
4. Tap **Close tools** to hide the tool area and give the conversation more space. Opening tools again selects Terminal; use **Editor** or **Browser** to return to either tool.
**Close tools** controls the panel view. To interrupt a command or end a terminal session, use the [terminal controls](/workspace/terminal#interrupt-hide-clear-or-close).
The tablet tool bar has three destinations:
| Button | What opens |
| - | - |
| **Terminal** | The project's terminal view and terminal-list controls. |
| **Editor** | The project's file browser and open documents. |
| **Browser** | Pages and [project previews](/workspace/browser). |
### Change project or open Settings
With the chat list hidden, tap the project name in the chat header, labelled **Switch project**. The menu shows known workspaces and their computer names when available. Choosing another available workspace opens its new-conversation draft; to resume a previous chat, select that conversation from the chat list instead. Use **Open Project...** to browse for a project.
To open Settings, tap **Show chat list**, then **Settings** beside the list's search field. The [mobile settings destinations](/reference/settings#find-settings-on-mobile) apply here too. Use the composer's [Chat settings](/models/overview#choose-on-ios-or-android) to choose a harness and model for a new conversation.
### When the window gets narrower
The tool panel can overlap the conversation in a narrower tablet window. Tap **Close tools** to uncover the chat, or give Kisuke a wider window to see more of both. The chat list can also overlay the conversation; selecting a chat dismisses that overlaid list. In a wider window, the list can stay beside the conversation; **Hide chat list** gives the chat more room.
A sufficiently small app window switches to the phone layout, where **Chat**, **Terminal**, **Editor**, and **Browser** are separate navigation destinations. Check the selected project and conversation after resizing. The layout change does not establish that a remote device is connected; follow [device recovery](/workspace/devices#the-device-appears-but-its-workspace-will-not-open) if content remains unavailable.
## Use Worktree style
To create another working folder and branch, follow [Work in a separate checkout](/projects/worktrees). The guide covers Zen's environment menu, file-copy behavior, and checking the destination before your first prompt.
**Settings → General → Work mode** has a separate **Worktree style** choice. It focuses the workspace around worktree chats. Turning it on while inside a worktree hides the sidebar and right panel to give the conversation more room.
You can reopen the panels you need. Moving between conversations does not repeatedly hide a sidebar you opened yourself.
**Default workspace mode** chooses Zen or Classic. **Work mode** controls the worktree-focused presentation within that experience. Choose each according to how you want to work.
## Choose your model
The model button is part of the composer in Zen mode. Open it to inspect the available models and reasoning controls. For a new conversation, the picker also lets you choose an available harness.
See [Models and harnesses](/models/overview) for how OpenAI, Anthropic, Google, and other provider connections fit together.
The adjacent [permission menu](/conversations/permissions) controls when the agent can act. Choose [Plan](/conversations/planning) when you want to review an approach before implementing it.
Use [attachments and long text pastes](/conversations/attachments) to supply a document, screenshot, or reference alongside your instruction.
Use [skills](/customization/skills) to bring a reusable procedure into your request, such as an accessibility review or a project-specific checklist.
For work that needs several turns, [set a goal](/conversations/goals) with a concrete outcome and verification criteria. Follow its progress in the conversation while keeping the relevant files and Review panel beside it.
During a response, [read its steps and progress](/conversations/track-progress). When the agent delegates work, [inspect a subagent](/conversations/subagents) in the right panel while keeping the main conversation in view.
When the agent needs a decision, [answer its questions](/conversations/answer-questions). A structured request replaces the composer with answer controls; questions written in the transcript can be answered in a normal reply.
For team issue work, choose **Switch layout → Tasks** to [browse Linear issues and save useful views](/workspace/tasks), then [run an issue in its own workspace](/workspace/run-a-task). Return to **Zen** from the same menu to focus on a conversation.
## If a panel is missing
| What you see | What to do |
| - | - |
| No right-panel control on the project landing screen | Open a project first, then look for **Open right panel**. |
| No summary on a new draft | The summary belongs to an active conversation. Check the draft's project and device controls before sending. |
| Summary disappears after opening a wide tool panel | Choose **Show summary**, or hide/narrow the right panel to make room. |
| The panel reopens to Files or Browser instead of the launcher | That tab is still selected. Use **+ → Review**, **Terminal**, or another tool to change destination. |
| New-tab search offers a web search for a filename | Choose a result in **Files**, or clear the search and open **Files** to browse. |
A visible panel does not prove that its device is connected or its resource is ready. For a loading/error state, use the recovery steps for [Files](/workspace/files#if-a-file-or-tree-is-missing), [Terminal](/workspace/terminal), or [Browser](/workspace/browser) rather than repeatedly opening more tabs.
For keyboard navigation, see [Keyboard shortcuts](/reference/keyboard-shortcuts).
This documentation is built and hosted on [Mintlify](https://mintlify.com), a developer documentation platform.
If reopening the separate window produces the same result, keep working in the original window and report the app version, operating system, affected conversation, and visible loading or error state. A loading window by itself does not identify a provider sign-in problem.
## Use Zen on a tablet
On iPad and Android tablets, Kisuke uses the Zen workspace automatically when the app window is large enough. [Connect to your project computer](/workspace/devices), open its workspace, and keep Connect running there. The computer still provides the files, terminals, and agent runtime.
### Open a conversation and a tool
1. Tap **Show chat list** in the chat header. Select an existing conversation and check its latest exchange before continuing. The list uses the same [project browsing and title search](/conversations/find-conversations#find-and-resume-on-your-phone) as the phone.
2. Tap **Open tools** in the chat header to open **Terminal**. Use the tool bar's **Terminal**, **Editor**, and **Browser** buttons to switch tools.
3. For a file mentioned in the conversation, choose **Editor**. If a document is already open, use **Show file tree** to browse to another file. With no document open, the file browser appears directly.
4. Tap **Close tools** to hide the tool area and give the conversation more space. Opening tools again selects Terminal; use **Editor** or **Browser** to return to either tool.
**Close tools** controls the panel view. To interrupt a command or end a terminal session, use the [terminal controls](/workspace/terminal#interrupt-hide-clear-or-close).
The tablet tool bar has three destinations:
| Button | What opens |
| - | - |
| **Terminal** | The project's terminal view and terminal-list controls. |
| **Editor** | The project's file browser and open documents. |
| **Browser** | Pages and [project previews](/workspace/browser). |
### Change project or open Settings
With the chat list hidden, tap the project name in the chat header, labelled **Switch project**. The menu shows known workspaces and their computer names when available. Choosing another available workspace opens its new-conversation draft; to resume a previous chat, select that conversation from the chat list instead. Use **Open Project...** to browse for a project.
To open Settings, tap **Show chat list**, then **Settings** beside the list's search field. The [mobile settings destinations](/reference/settings#find-settings-on-mobile) apply here too. Use the composer's [Chat settings](/models/overview#choose-on-ios-or-android) to choose a harness and model for a new conversation.
### When the window gets narrower
The tool panel can overlap the conversation in a narrower tablet window. Tap **Close tools** to uncover the chat, or give Kisuke a wider window to see more of both. The chat list can also overlay the conversation; selecting a chat dismisses that overlaid list. In a wider window, the list can stay beside the conversation; **Hide chat list** gives the chat more room.
A sufficiently small app window switches to the phone layout, where **Chat**, **Terminal**, **Editor**, and **Browser** are separate navigation destinations. Check the selected project and conversation after resizing. The layout change does not establish that a remote device is connected; follow [device recovery](/workspace/devices#the-device-appears-but-its-workspace-will-not-open) if content remains unavailable.
## Use Worktree style
To create another working folder and branch, follow [Work in a separate checkout](/projects/worktrees). The guide covers Zen's environment menu, file-copy behavior, and checking the destination before your first prompt.
**Settings → General → Work mode** has a separate **Worktree style** choice. It focuses the workspace around worktree chats. Turning it on while inside a worktree hides the sidebar and right panel to give the conversation more room.
You can reopen the panels you need. Moving between conversations does not repeatedly hide a sidebar you opened yourself.
**Default workspace mode** chooses Zen or Classic. **Work mode** controls the worktree-focused presentation within that experience. Choose each according to how you want to work.
## Choose your model
The model button is part of the composer in Zen mode. Open it to inspect the available models and reasoning controls. For a new conversation, the picker also lets you choose an available harness.
See [Models and harnesses](/models/overview) for how OpenAI, Anthropic, Google, and other provider connections fit together.
The adjacent [permission menu](/conversations/permissions) controls when the agent can act. Choose [Plan](/conversations/planning) when you want to review an approach before implementing it.
Use [attachments and long text pastes](/conversations/attachments) to supply a document, screenshot, or reference alongside your instruction.
Use [skills](/customization/skills) to bring a reusable procedure into your request, such as an accessibility review or a project-specific checklist.
For work that needs several turns, [set a goal](/conversations/goals) with a concrete outcome and verification criteria. Follow its progress in the conversation while keeping the relevant files and Review panel beside it.
During a response, [read its steps and progress](/conversations/track-progress). When the agent delegates work, [inspect a subagent](/conversations/subagents) in the right panel while keeping the main conversation in view.
When the agent needs a decision, [answer its questions](/conversations/answer-questions). A structured request replaces the composer with answer controls; questions written in the transcript can be answered in a normal reply.
For team issue work, choose **Switch layout → Tasks** to [browse Linear issues and save useful views](/workspace/tasks), then [run an issue in its own workspace](/workspace/run-a-task). Return to **Zen** from the same menu to focus on a conversation.
## If a panel is missing
| What you see | What to do |
| - | - |
| No right-panel control on the project landing screen | Open a project first, then look for **Open right panel**. |
| No summary on a new draft | The summary belongs to an active conversation. Check the draft's project and device controls before sending. |
| Summary disappears after opening a wide tool panel | Choose **Show summary**, or hide/narrow the right panel to make room. |
| The panel reopens to Files or Browser instead of the launcher | That tab is still selected. Use **+ → Review**, **Terminal**, or another tool to change destination. |
| New-tab search offers a web search for a filename | Choose a result in **Files**, or clear the search and open **Files** to browse. |
A visible panel does not prove that its device is connected or its resource is ready. For a loading/error state, use the recovery steps for [Files](/workspace/files#if-a-file-or-tree-is-missing), [Terminal](/workspace/terminal), or [Browser](/workspace/browser) rather than repeatedly opening more tabs.
For keyboard navigation, see [Keyboard shortcuts](/reference/keyboard-shortcuts).
This documentation is built and hosted on [Mintlify](https://mintlify.com), a developer documentation platform.