> ## Documentation Index
> Fetch the complete documentation index at: https://docs.kisuke.dev/llms.txt
> Use this file to discover all available pages before exploring further.
# Files and the editor
> Browse project files beside a Zen conversation, edit and save text, and control what appears in the file tree.
Open files beside your conversation to inspect an explanation, review a proposed change, or make an edit yourself. The instructions below use the desktop and web Zen workspace.
To supply a file from your computer with a request, use the composer's [Attach files control](/conversations/attachments).
To rearrange project entries, see [Copy, move, and rename files](/workspace/organize-files). That guide covers the explorer clipboard, saved-file copies, open editors after a move, and interrupted transfers.
To locate a filename or a word inside saved files, see [Find files and search text](/workspace/search-files). Search follows the selected folder and has separate filters from the explorer.
To copy files from your computer or phone into the project, see [Import files](/workspace/import-files). That guide also covers retrieving a saved copy and the preview's current download limits.
## Browse a project
First [open the project](/projects/open-a-project) on the device containing the files. Open Zen's right panel and choose **Files**. If the panel already has tabs, use its new-tab menu to open Files.
Select a file in the tree to open it. Use **Browse Files** to show or hide the tree, and drag the panel divider when you need more room for the document. The file path appears above the content.
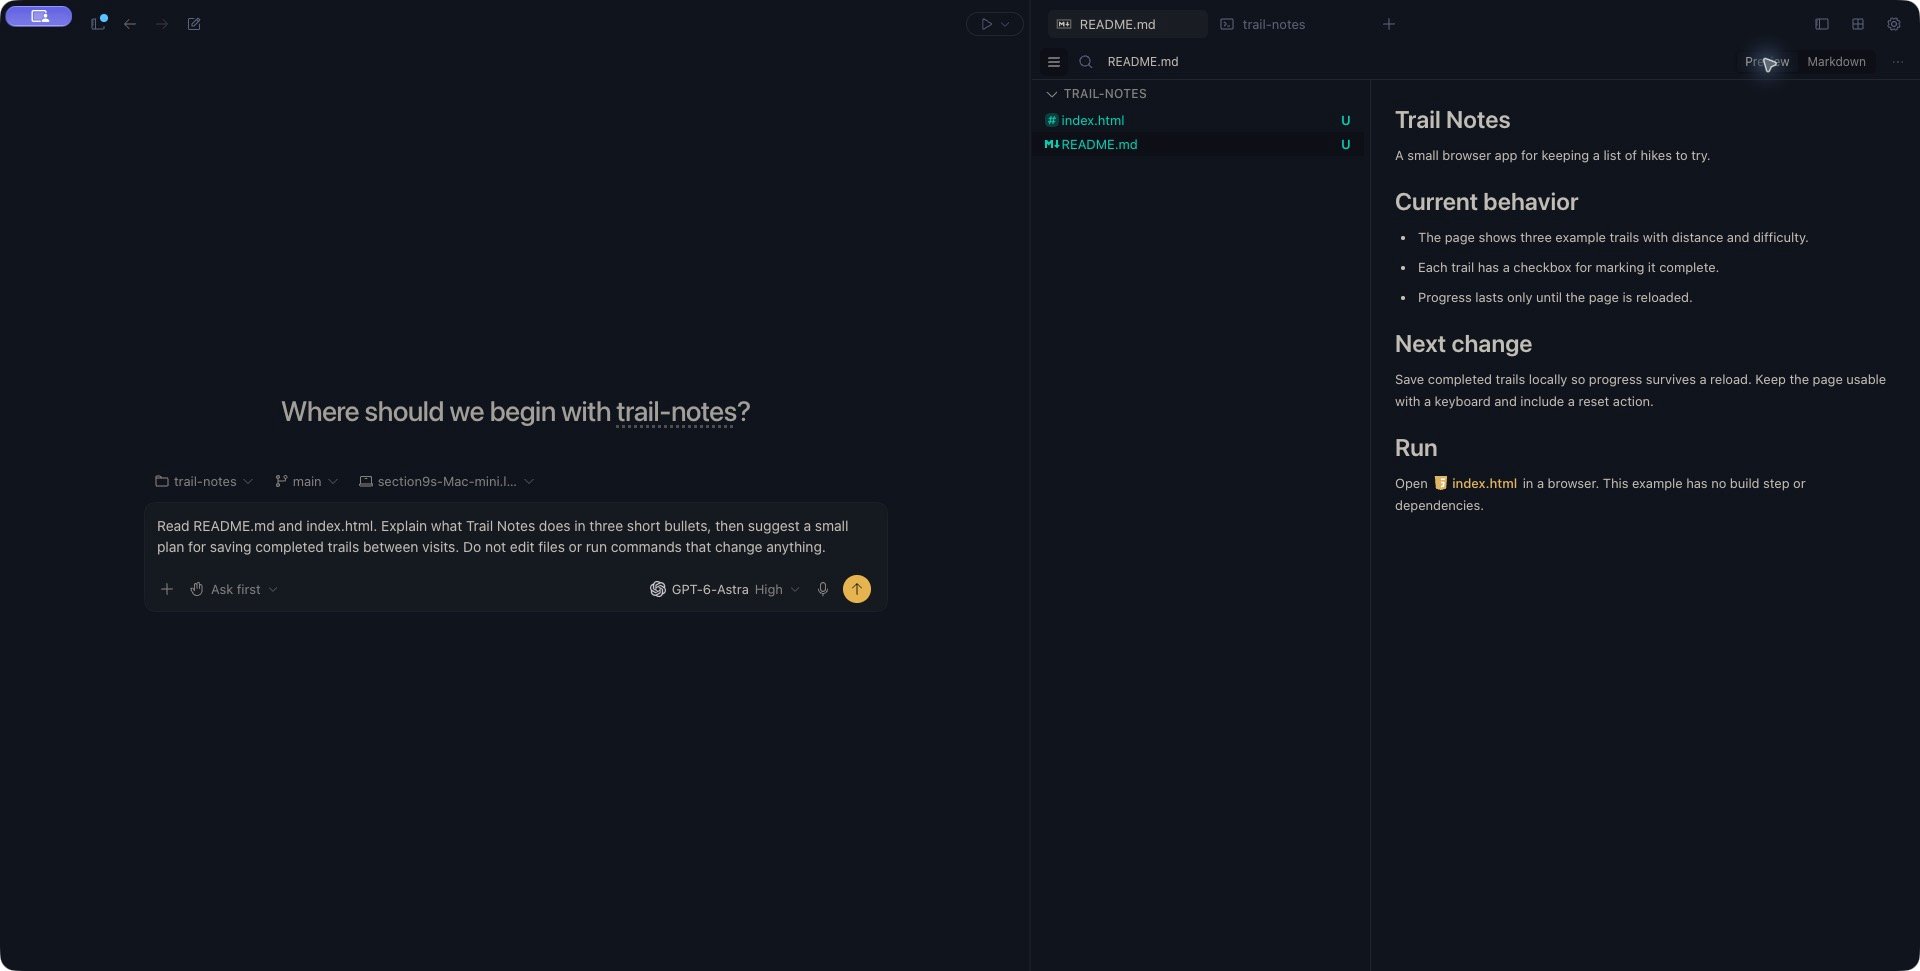 The project tree's header has **New File**, **New Folder**, and **Reload** controls. Use Reload to request a fresh listing. The disabled **New File** button in an empty editor is not the tree-header action.
## Edit and save text
1. Open the text file you want to change.
2. For Markdown, select **Markdown** above the document to switch from the rendered **Preview** to source.
3. Edit the content.
4. Press **Cmd+S** on macOS or **Ctrl+S** on Windows and Linux to save.
Saving writes to the file on the project's device. If the save reports an error, keep the editor open and resolve the connection or filesystem problem before treating your changes as saved.
For a Git project, open [Review](/workspace/git) in another panel tab to inspect changed files and stage the edits you want to include in a commit.
Markdown files open in Preview by default in this Zen surface. You can switch between Preview and Markdown while working. A rendered preview is not the source editor.
## Respond to a file changed elsewhere
If an already-open Markdown **Preview** still shows earlier text after an agent or another editor changes the file, close and reopen its file tab when you have no unsaved edits. Preserve any unsaved work before closing. Switching away from the tab and back may still show the retained preview; the file tree's **Reload** refreshes the listing.
The text editor listens for file changes from the project device. A clean buffer can refresh from disk. If you have unsaved edits, you may instead see **has been updated remotely. Reload?**
* **Reload** requests the disk version and discards the unsaved version when the reload succeeds.
* **Dismiss** closes the notice so you can keep working with your current buffer.
If the reload fails, the notice reports that your edits were kept. Check the connection and retry. Preserve any edits you need before choosing Reload; dismissing the notice does not merge the disk version into your buffer.
## Show hidden or ignored files
On desktop and web, open **Settings → Appearance → File Explorer**. On mobile, the corresponding controls are under **Settings → Editor → File Explorer**.
| Control | Effect |
| - | - |
| **Show hidden files** | Reveals entries excluded by the hidden patterns or ignore-file filtering, including `.git`. |
| **Hide ignored files** | Applies the project's `.gitignore` and `.ignore` rules to the explorer. |
| **Hidden file patterns** | Excludes names or glob patterns from the explorer. Enter one per line, then choose **Apply**. |
For example, a hidden-pattern list can include:
```text theme={null}
node_modules
**/*.log
```
The default patterns hide common dependency, build, cache, and version-control directories. Ordinary dotfiles such as `.env` and `.gitignore` are not all hidden merely because their names start with a dot.
Negated patterns starting with `!` are not supported. Remove an exclusion or use **Show hidden files** when you want to reveal those entries.
These settings control presentation. They do not delete files, prevent direct opening, or restrict what an agent may access. Use [permissions](/conversations/permissions) to understand agent actions.
## If a file or tree is missing
Check the project and device first, then use **Browse Files** if the tree is collapsed. Review the visibility settings if only particular entries are missing.
Files opened from outside the project, such as an external conversation artifact, can appear without the project tree. That does not move the file into the project.
If a Markdown preview reports **Could not open**, inspect the error and choose **Retry** after correcting the problem. A loading or failed read is not an empty file.
This documentation is built and hosted on [Mintlify](https://mintlify.com), a developer documentation platform.
The project tree's header has **New File**, **New Folder**, and **Reload** controls. Use Reload to request a fresh listing. The disabled **New File** button in an empty editor is not the tree-header action.
## Edit and save text
1. Open the text file you want to change.
2. For Markdown, select **Markdown** above the document to switch from the rendered **Preview** to source.
3. Edit the content.
4. Press **Cmd+S** on macOS or **Ctrl+S** on Windows and Linux to save.
Saving writes to the file on the project's device. If the save reports an error, keep the editor open and resolve the connection or filesystem problem before treating your changes as saved.
For a Git project, open [Review](/workspace/git) in another panel tab to inspect changed files and stage the edits you want to include in a commit.
Markdown files open in Preview by default in this Zen surface. You can switch between Preview and Markdown while working. A rendered preview is not the source editor.
## Respond to a file changed elsewhere
If an already-open Markdown **Preview** still shows earlier text after an agent or another editor changes the file, close and reopen its file tab when you have no unsaved edits. Preserve any unsaved work before closing. Switching away from the tab and back may still show the retained preview; the file tree's **Reload** refreshes the listing.
The text editor listens for file changes from the project device. A clean buffer can refresh from disk. If you have unsaved edits, you may instead see **has been updated remotely. Reload?**
* **Reload** requests the disk version and discards the unsaved version when the reload succeeds.
* **Dismiss** closes the notice so you can keep working with your current buffer.
If the reload fails, the notice reports that your edits were kept. Check the connection and retry. Preserve any edits you need before choosing Reload; dismissing the notice does not merge the disk version into your buffer.
## Show hidden or ignored files
On desktop and web, open **Settings → Appearance → File Explorer**. On mobile, the corresponding controls are under **Settings → Editor → File Explorer**.
| Control | Effect |
| - | - |
| **Show hidden files** | Reveals entries excluded by the hidden patterns or ignore-file filtering, including `.git`. |
| **Hide ignored files** | Applies the project's `.gitignore` and `.ignore` rules to the explorer. |
| **Hidden file patterns** | Excludes names or glob patterns from the explorer. Enter one per line, then choose **Apply**. |
For example, a hidden-pattern list can include:
```text theme={null}
node_modules
**/*.log
```
The default patterns hide common dependency, build, cache, and version-control directories. Ordinary dotfiles such as `.env` and `.gitignore` are not all hidden merely because their names start with a dot.
Negated patterns starting with `!` are not supported. Remove an exclusion or use **Show hidden files** when you want to reveal those entries.
These settings control presentation. They do not delete files, prevent direct opening, or restrict what an agent may access. Use [permissions](/conversations/permissions) to understand agent actions.
## If a file or tree is missing
Check the project and device first, then use **Browse Files** if the tree is collapsed. Review the visibility settings if only particular entries are missing.
Files opened from outside the project, such as an external conversation artifact, can appear without the project tree. That does not move the file into the project.
If a Markdown preview reports **Could not open**, inspect the error and choose **Retry** after correcting the problem. A loading or failed read is not an empty file.
This documentation is built and hosted on [Mintlify](https://mintlify.com), a developer documentation platform.